
Android Service簡述Service 生命週期Started 模式Bind 模式解析 startService 測試角色Service 端Client 端結果生命週期流程再次分析onStartCommand() 的回傳值解析 bindServiceClient 與 Service 在同一個 App 中測試角色Service 端Client 端測試流程測試一步驟結果測試二步驟結果測試三步驟結果生命週期流程Client 與 Service 在同一個 App 中淺談 Service v.s. threadRef.
Android Service
簡述
Service可以在背景不斷的工作,直到停止或是系統無法提供資源為止。Service需要透過某Activity或者其他Context物件來啟動。Service不需要和 user 互動,所以沒有操作介面。- 生命週期與
Activity是各自獨立的,Activity就算關閉,Service仍然可以繼續執行。 - 類似
BroadcastReceiver,需要定義一個繼承Service的類別,並覆寫其中的生命週期函數,最後在AndroidManifest.xml中宣告才能使用 Service可以同時支援 Started 與 Bind 兩種模式。在這種情況下,Service需要等到兩種模式都被關閉才會觸發onDestroy()事件。Service只有第一次被啟動時,會執行onCreate(),若重複啟動則不會執行onCreate()。Service的運作優先權相當的高,一般來說除非系統資源耗盡,否則 Android 不會主動關閉一個已被啟動的Service。一旦系統有足夠的資源,被 Android 關閉的Service也會被重新啟動。- 兩者都需要在
AndroidManifest.xml宣告
<service android:name=".MyService" android:enabled="true" /><!-- .MyService: 實作繼承Service的類別名稱 -->Service 生命週期
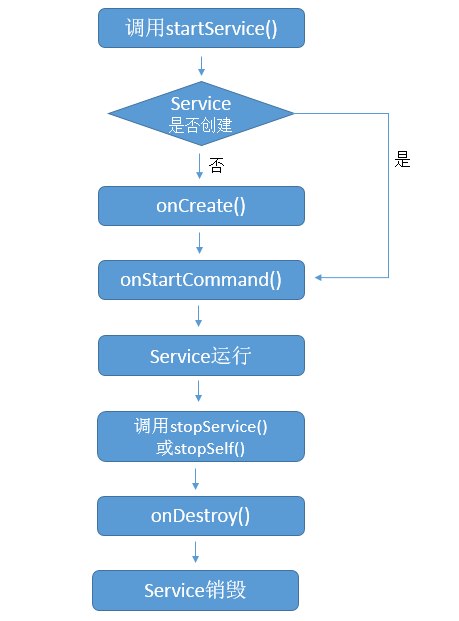
根據執行方式的不同,啟動Service分為兩種,注意只有黃色區塊不一樣:
圖左- Started 模式;圖右- Bind 模式,並根據不同模式複寫白色框框裡的函式。

Started 模式
啟動此模式的 Service,即便退出 Activity 也不會影響 Service 的運行,且Activity無法調用 Service 的方法。
啟動
Service的方式- Client side (
Activity):Context.startService(intent)
- Client side (
關閉
Service的方式- Client side (
Activity):Context.stopService() - Service inside:
stopSelf()
- Client side (
onStartCommand()最後需要回傳一個常數,這些常數定義在Service類別中。該回傳值是用在如果這個Service被 Android 作業系統終止後的行為:Service.START_STICKYService如果被中止的話會自動重啟。用在onStartCommand()方法中不需要依賴Intent傳入的資料就可以執行的時候(重新啟動時重新傳入的Intent會是null)。這也是預設使用super.onStartCommnad()的回傳值。Service.START_NOT_STICKYServcie如果被中止的話不重新啟動,用在onStartCommand()方法中所執行的工作需要依賴Intent物件內帶進來的參數。Service.START_REDELIVER_INTENT和START_STICKY差不多,但 Android 會在中止Service之前將Intent保留下來,等待重新啟動時再將原本的Intent物件交還給onStartCommand()事件。
Bind 模式
啟動此模式的 Service,會伴隨著與調用者(Client)一起存活或是退出,當Activity退出Service的運行也會一起終止。
啟動
Service的方式- Client side (
Activity):Context.bindService(intent, mServiceConnection, int flags)。其中第二個參數為ServiceConnection物件,當bindService()綁定成功後,會呼叫此物件內的onServiceConnected函式,此函式會接收到由Service內的onBind()所丟出來的IBinder物件來直接操作Service內各個public的 method。 (ServiceConnection物件實作方式參考下方連結)
- Client side (
關閉
Service的方式Serviceinside:unbindService(mServiceConnection);
解析 startService
透過以下範例了解startService運作流程,若需詳細程式碼請參考
測試角色
Service 端
TestService
Client 端
MainActive
x...public class MainActivity extends Activity { protected void onCreate(Bundle savedInstanceState) { super.onCreate(savedInstanceState); setContentView(R.layout.activity_main); Log.i("DemoLog", "Thread ID: " + Thread.currentThread().getId()); Log.i("DemoLog", "before test startService"); //连续启动Service Intent intent1 = new Intent(this, TestService.class); startService(intent1); Intent intent2 = new Intent(this, TestService.class); startService(intent2); Intent intent3 = new Intent(this, TestService.class); startService(intent3); //停止Service Intent intent4 = new Intent(this, TestService.class); stopService(intent4); //再次启动Service Intent intent5 = new Intent(this, TestService.class); startService(intent5); Log.i("DemoLog", "after test startService"); }}結果
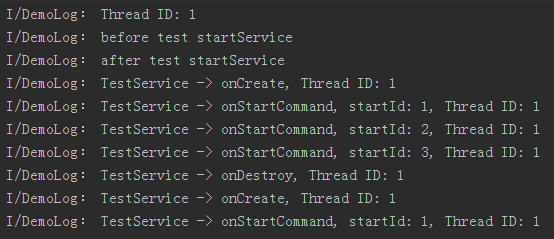
生命週期流程
再次分析onStartCommand() 的回傳值
START_NOT_STICKY- 表示當
Service運行的 process 被 Android 系統強制殺掉之後,不會重新創建該Service,當然如果在其被殺掉之後一段時間又調用了startService,那麼該Service又將被實例化。 - Ex:某個
Service需要定時從 server 獲取最新數據:通過一個定時器每隔指定的N分鐘讓定時器啟動Service去獲取 server 的最新數據。當執行到Service的onStartCommand時,在該方法內再規劃一個N分鐘後的定時器用於再次啟動Service並開闢一個新的執行緒去執行網絡操作。假設Service在從 server 獲取最新數據的過程中被 Android 系統強制殺掉,Service不會再重新創建,這也沒關係,因為再過N分鐘定時器就會再次啟動該Service並重新獲取數據。
- 表示當
START_STICKY- 表示
Service運行的 process 被 Android 系統強制殺掉之後,Android 系統會將該Service依然設置為 started 狀態(即運行狀態),但是不再保存onStartCommand方法傳入的intent對象,然後 Android 系統會嘗試再次重新創建該Service,並執行onStartCommand回調方法,但是onStartCommand回調方法的Intent參數為null,也就是onStartCommand方法雖然會執行但是獲取不到intent信息。 - Ex:如果
Service可以在任意時刻運行或結束都沒什麼問題,而且不需要intent信息,那麼就可以在onStartCommand方法中返回START_STICKY,比如一個用來播放背景音樂功能的Service就適合返回該值
- 表示
START_REDELIVER_INTENT- 表示
Service運行的 process 被 Android 系統強制殺掉之後,與返回START_STICKY的情況類似,Android 系統會將再次重新創建該Service,並執行onStartCommand回調方法,但是不同的是,Android 系統會再次將Service在被殺掉之前最後一次傳入onStartCommand方法中的Intent再次保留下來,並再次傳入到重新創建後的Service的onStartCommand方法中,這樣我們就能讀取到intent參數。 - Ex:如果
Service需要依賴具體的Intent才能運行(需要從Intent中讀取相關數據信息等),並且在強制銷毀後有必要重新創建運行,那麼這樣的Service就適合。
- 表示
解析 bindService
Client 與 Service 在同一個 App 中
透過以下幾個範例了解 bindService 的運作流程,若需詳細程式碼請參考
測試角色
Service 端
TestService
Client 端
- 兩個
Activity,分別為Active A與Active B
Activity A
Activity B
測試流程
測試一
步驟
Activity A- click bindService
- click unbindService
結果

測試二
步驟
Activity A- click bindService
- click Finish
結果

測試三
步驟
Activity A- click bindService
- click start Activity B
Activity B- click bindService
- click unbindService
- click Finish
Activity A- click unbindService
結果

生命週期流程

Client 與 Service 在同一個 App 中
淺談 Service v.s. thread
看似都是在背景運作,但實際上
Service與Thread沒有任何關係。Service是運行於主執行緒(Main Thread)上,故若在此執行太耗時的任務,依然會出現 ANR。Thread是用於開啟一個子執行緒(Child thread),去執行一些耗時作不會阻塞主執行緒的運行。Activity很難對Thread進行控制:- 當
Activity被銷毀後卻沒有主動停止thread,就會造成没有辦法可以再重新獲取到之前建立的thread的實例。 - 在某
Activity中建立的thread,另一個Activity無法對其進行操作。
- 當
Service方便取得控制權:- 當
Activity被銷毀,其他的Activity都可以與Service重新進行關聯,就又能夠獲取到原有Service中 Binder 的實例。 - 使用
Service來處理後台任務,Activity可以放心地 finish,完全不需要擔心無法對後台任務進行控制的情況。
- 當
如果在
Service內部做一些很耗時的任務,可以在Service內部建立一個執行緒來處理。因為Service是跑在主執行緒中,會影響到 UI 操作或是阻擋主執行緒的運行- ex:在後台播放多媒體檔案會需要檢查SD、在後台紀錄 gps 資訊的變換等等
Ref.
《Android》『Service』- 背景執行服務的基本用法
Android中startService的使用及Service生命周期
Android中bindService的使用及Service生命周期


