2022/04/25

電商營收數據指標

商品成交金額 GMV

商品成交金額(Gross Merchandise Volume,簡稱GMV

  • GMV = (來客數) 流量 × 購買轉換率 × 平均客單價

來客數、流量

可再區分裝置 (PC/Mobile/APP)、通路(自然流量/付費流量)

  • Unique Visitor

    不重複的來客數,實際上有多少訪客

  • Page View

    每一個頁面的瀏覽數量

  • Session

    使用者進入網站的次數,同一個使用者可能連接很多 Page。

  • MAU/WAU

    每月/週活躍用戶,檢視吸引用戶的能力

  • 下載量

    APP 下載數量

轉換率

從來店人流數量,轉換為真正購買的來客數量

  • CVR, Conversion Rate

    各頁面的轉換率

    從進入平台到結帳前,分析客戶是從哪個步驟跳開,分析產品的「訊息流」「任務流」

    訊息流 是從商品供給角度提供的商品內容與資訊,例如商品規格、評價、導購文章等

    任務流 是從用戶需求的角度去搜尋並找到他所需要的商品,例如搜尋篩選器、熱銷排行榜、推薦商品等

  • Bounce Rate

    CVR 的相反,了解是從哪裡跳開的

平均客單價 ABS、AOV

ABS (Average Basket Size) AOV (Average Order Value)

當客戶流量降低時,提升 ABS 是提升毛利的方法,常見的方法有:免運、折扣、跨銷、綁售

電商營運指標

流量指標

  • Session
  • Unique Visitor
  • Page View

轉化指標

  • CVR

用戶指標

  • 客單價 AOV

  • 用戶黏性

    • DAU (Daily Activited Users)

      日活躍用戶數

    • MAU (Monthly Activited Users)

      自統計之日算起一個月內登錄過APP的使用者總量

  • 用戶留存 Retention 回購

商品指標

  • 商品總數

    • SKU (Stock Keeping Unit)

      單品項管理、最小存貨單位

    • 庫存

  • 商品優勢

    • 個別商品轉化率&收入佔比、商品最低價比例

風險管控指標

  • 評價、投訴率、退貨率

拆解營收

  • 營收 = 來客數 * 購買轉換率 * 客單價

  • 營收 = 新客數 * 新客轉化率 * 新客的單價 + 舊客數 * 舊客回訪率 * 舊客轉換率 * 舊客單價

    區分新舊客戶數量

  • 營收 = 某某 channel 導流數 * 各自channel 轉化率 * 客單價

    區分網路流量來源,ex: EDM、LINE 官方帳號、搜尋流量、直接流量、網紅流量

  • 營收 = 品類一 * 銷售量 * 單價 + 品類二 * 銷售量 * 單價

    區分商品品項

  • 營收 = 通路一 * 銷售量 * 單價 + 通路二 * 銷售量 * 單價

    區分通路

  • 營收 = Campiagn 時期流量 * 轉化率 * 客單價 + 平常時期流量 * 轉化率 * 客單價

    區分週年慶時期

  • 營收 = 流量池導流數 * 轉化率 * 客單價 + 付費流量 * 轉化率 * 客單價 + 自然流量 * 轉化率 * 客單價

    LINE 官方帳號、APP 用戶,都被歸類在流量池

  • 營收 = 獲客數 * 回訪率 * 付費轉換率 * 付費頻率 * 客單價

    ex: 免費手遊

References

電商營收哪裡來?拆解各項重要數據指標

八種拆解營收的方法

電商 PM 都應了解的 5 大數據運營指標 -【數據乾貨大全】

電商人必備!68個常見電商專有名詞

2022/04/18

vuex

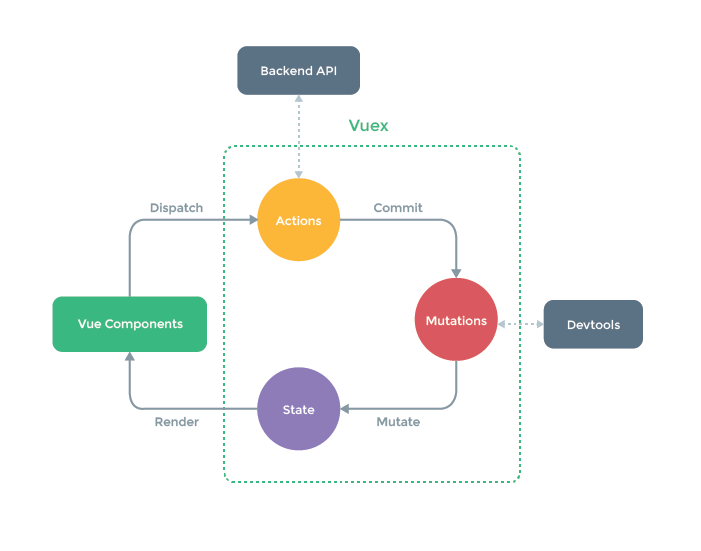
Vuex 是 state management pattern + library 工具,集中儲存所有 components,加上特定改變狀態的規則。

State Management Pattern

  • state: 目前 app 的狀態
  • view: 根據 state 產生的畫面
  • actions: 從 view 取得 user input,修改 state

如果有多個 components 共享 common state 會遇到的問題

  • multiple views 會由 the same piece of state 決定
  • 由不同的 views 產生的 actions,可改變 the same piece of state

Vuex 提出的方法是將 shared state 由 components 取出來,並用 global singleton 管理。

Vuex 可協助處理 shared state management,如果 app 很簡單,不是大型 SPA,就不需要 Vuex,只需要用 store pattern 即可

Store Pattern

如果有兩個 component 需要共享一個 state 時,可能會這樣寫

<div id="app-a">App A: {{ message }}</div>
<div id="app-b">App B: {{ message }}</div>

<script>
const { createApp, reactive } = Vue

const sourceOfTruth = reactive({
  message: 'Hello'
})

const appA = createApp({
  data() {
    return sourceOfTruth
  }
}).mount('#app-a')

const appB = createApp({
  data() {
    return sourceOfTruth
  },
  mounted() {
    sourceOfTruth.message = 'Goodbye' // both apps will render 'Goodbye' message now
  }
}).mount('#app-b')

</script>

畫面上兩個文字部分,都會變成 Goodbye

因為 sourceOfTruth 可以在程式中任意一個地方,被修改資料,當程式變多,會造成 debug 的難度。

這個問題就用 store pattern 處理。

store 類似 java 的 data object,透過 set method 修改資料內容,資料以 reactive 通知 Vue 處理異動。

<div id="app-a">{{sharedState.message}}</div>
<div id="app-b">{{sharedState.message}}</div>

<script>
const { createApp, reactive } = Vue

const store = {
  debug: true,

  state: reactive({
    message: 'Hello!'
  }),

  setMessageAction(newValue) {
    if (this.debug) {
      console.log('setMessageAction triggered with', newValue)
    }

    this.state.message = newValue
  },

  clearMessageAction() {
    if (this.debug) {
      console.log('clearMessageAction triggered')
    }

    this.state.message = ''
  }
}

const appA = createApp({
  data() {
    return {
      privateState: {},
      sharedState: store.state
    }
  },
  mounted() {
    store.setMessageAction('Goodbye!')
  }
}).mount('#app-a')

const appB = createApp({
  data() {
    return {
      privateState: {},
      sharedState: store.state
    }
  }
}).mount('#app-b')

Simplest Store

Vuex app 的核心就是 store,用來儲存 app 的狀態,以下兩點,是 Vuex store 跟 global object 的差異

  1. Vuex stores 是 reactive,如果 Vue component 使用了 state,將會在 state 異動時,自動更新 component
  2. 無法直接修改 store 的 state,修改的方式是透過 committing mutations,可確保 state change 可被追蹤

透過 mutations methods 異動 state

<div id="app-a">
  {{sharedState.count}}
   <button @click="increment">increment</button>
</div>

<script>
// import { createApp } from 'vue'
// import { createStore } from 'vuex'
const { createApp, reactive } = Vue
const { createStore } = Vuex

// Create a new store instance.
const store = createStore({
  state () {
    return {
      count: 0
    }
  },
  mutations: {
    increment (state) {
      state.count++
    }
  }
})

const app = createApp({
  data() {
    return {
      privateState: {},
      sharedState: store.state
    }
  },
  methods: {
    increment() {
      this.$store.commit('increment')
      console.log(this.$store.state.count)
    }
  }
})

app.mount('#app-a')
app.use(store)

</script>

State

Single State Tree

single state tree 就是包含 application 所有 state 的單一物件,也就是 "single sure of truth",每一個 application 都只有一個 store。單一物件容易使用部分 state 資料,也很容易 snapshot 目前的狀態值。

single state 並不會跟 modularity 概念衝突,後面會說明如何將 state 與 mutations 分割到 sub modules

store 儲存的 data 遵循 Vue instance 裡面的 data 的規則

Getting Vuex State into Vue Components

因為 Vuex store 是 reactive,最簡單的方法就是透過 computed property 取出部分 store state

以下產生一個 component,並將 store inject 到 component 中,透過 this.$store 存取

<div id="app">
  <counter></counter>
</div>

<script>
// import { createApp } from 'vue'
// import { createStore } from 'vuex'
const { createApp, reactive } = Vue
const { createStore } = Vuex

// Create a new store instance.
const store = createStore({
  state () {
    return {
      count: 0
    }
  },
  mutations: {
    increment (state) {
      state.count++
    }
  }
})


const app = createApp({
  data() {
    return {
      privateState: {},
      sharedState: store.state
    }
  },

})

const Counter = {
  template: `<div>{{ count }}</div> <button @click="increment">increment</button>`,
  computed: {
    count () {
      return this.$store.state.count
    }
  },
  methods: {
    increment() {
      this.$store.commit('increment')
      console.log(this.$store.state.count)
    }
  }
}

app.use(store)
app.component('counter', Counter)

app.mount('#app')

</script>

mapState

當 component 需要使用多個 store state properties or getters,宣告多個 computed property 會很麻煩,Vuex 用 mapState 產生 computed getter functions

<div id="app">
  <counter></counter>
</div>

<script>
// import { createApp } from 'vue'
// import { createStore } from 'vuex'
const { createApp, reactive } = Vue
const { createStore, mapState } = Vuex

// Create a new store instance.
const store = createStore({
  state () {
    return {
      count: 0
    }
  },
  mutations: {
    increment (state) {
      state.count++
    }
  }
})


const app = createApp({
  data() {
    return {
      privateState: {},
      sharedState: store.state
    }
  },

})

const Counter = {
  template: `<div>{{ count }}</div>
    <div>{{ countAlias }}</div>
    <div>{{ countPlusLocalState }}</div>
    <button @click="increment">increment</button>`,
  data() {
    return {
      localCount: 2,
    };
  },
  computed: mapState({
    // arrow functions can make the code very succinct!
    count: state => state.count,

    // passing the string value 'count' is same as `state => state.count`
    countAlias: 'count',

    // to access local state with `this`, a normal function must be used
    countPlusLocalState (state) {
      return state.count + this.localCount
    }
  }),
  methods: {
    increment() {
      this.$store.commit('increment')
      console.log(this.$store.state.count)
    }
  }
}

app.use(store)
app.component('counter', Counter)

app.mount('#app')

</script>

也可以直接傳入 string array 給 mapState,mapped computed property 的名稱要跟原本 state sub tree name 一樣

  computed: mapState([
      'count'
    ]),

Object Spread Operator

mapState 會回傳一個物件,如果要組合使用 local computed property,通常要用 utility 將多個物件 merge 在一起,再將該整合物件傳給 computed

利用 object spread operator 可簡化語法

<div id="app">
  <counter></counter>
</div>

<script>
// import { createApp } from 'vue'
// import { createStore } from 'vuex'
const { createApp, reactive } = Vue
const { createStore, mapState, mapGetters } = Vuex

// Create a new store instance.
const store = createStore({
  state () {
    return {
      count: 0,
      todos: [{
          id: 1,
          text: '...',
          done: true
        },
        {
          id: 2,
          text: '...',
          done: false
        }
      ]
    }
  },
  getters: {
    doneTodos: state => {
      return state.todos.filter(todo => todo.done)
    },
    doneTodosCount: (state,getters) => {
      return getters.doneTodos.length
    },
    getTodoById: (state) => (id) => {
      return state.todos.find(todo => todo.id === id)
    }
  },
  mutations: {
    increment (state) {
      state.count++
    }
  }
})


const app = createApp({
  data() {
    return {
      privateState: {},
      sharedState: store.state
    }
  },

})

const Counter = {
  template: `<div>
    <div>{{count}}</div>
    <div>{{countAlias}}</div>
    <div>{{countPlusLocalState}}</div>

    <div>{{doneTodos}}</div>
    <div>{{doneTodosAlias}}</div>
    <div>{{doneTodosCount}}</div>
    <div>{{getTodoById}}</div>
  </div>
    <button @click="increment">increment</button>`,
  data() {
    return {
      localCount: 2,
    };
  },
  computed: {

    // 本地 computed
    getTodoById() {
      return this.$store.getters.getTodoById(2);
    },

    // 使用展開運算符將 mapState 混合到外部物件中
    ...mapState([
      'count',
    ]),
    ...mapState({
      countAlias: 'count',
      countPlusLocalState(state) {
        return state.count + this.localCount;
      },
    }),

    // 使用展開運算符將 mapGetters 混合到外部物件中
    ...mapGetters([
      'doneTodos',
      'doneTodosCount',
    ]),
    ...mapGetters({
      doneTodosAlias: 'doneTodos',
    }),
  },
  methods: {
    increment() {
      this.$store.commit('increment')
      console.log(this.$store.state.count)
    }
  }
}

app.use(store)
app.component('counter', Counter)

app.mount('#app')

</script>

Getters

有時候需要根據儲存的 state 計算出衍生的 state

ex:

computed: {
  doneTodosCount () {
    return this.$store.state.todos.filter(todo => todo.done).length
  }
}

如果有多個 component 需要這個 function,可以在 store 裡面定義 getters,第一個參數固定為 state

const store = createStore({
  state: {
    todos: [
      { id: 1, text: '...', done: true },
      { id: 2, text: '...', done: false }
    ]
  },
  getters: {
    doneTodos (state) {
      return state.todos.filter(todo => todo.done)
    }
  }
})

Property-Style Access

getters 是透過 store.getters 物件使用

store.getters.doneTodos // -> [{ id: 1, text: '...', done: true }]

可接受其他 getters 為第二個參數

getters: {
  // ...
  doneTodosCount (state, getters) {
    return getters.doneTodos.length
  }
}
store.getters.doneTodosCount // -> 1

在 component 可這樣呼叫

computed: {
  doneTodosCount () {
    return this.$store.getters.doneTodosCount
  }
}

Method-Style Access

可利用 return a function 傳給 getters 參數,這對於查詢 store 裡面的 array 很有用

getters: {
  // ...
  getTodoById: (state) => (id) => {
    return state.todos.find(todo => todo.id === id)
  }
}
store.getters.getTodoById(2) // -> { id: 2, text: '...', done: false }

mapGetters

map store getters 為 local computed properties

import { mapGetters } from 'vuex'

export default {
  // ...
  computed: {
    // mix the getters into computed with object spread operator
    ...mapGetters([
      'doneTodosCount',
      'anotherGetter',
      // ...
    ])
  }
}

可 mapping 為不同名稱

...mapGetters({
  // map `this.doneCount` to `this.$store.getters.doneTodosCount`
  doneCount: 'doneTodosCount'
})

Mutations

修改 state 的方式是透過 committing a mutation

Vuex mutations 類似 events,每個 mutation 都有 string type 及 a handler

const store = createStore({
  state: {
    count: 1
  },
  mutations: {
    increment (state) {
      // mutate state
      state.count++
    }
  }
})

不能直接呼叫 mutation handler,必須這樣呼叫

store.commit('increment')

Commit with Payload

傳送新增的參數給 store.commit 稱為 mutation 的 payload

// ...
mutations: {
  increment (state, n) {
    state.count += n
  }
}

呼叫

store.commit('increment', 10)

通常 payload 會是一個 object,裡面有多個欄位

// ...
mutations: {
  increment (state, payload) {
    state.count += payload.amount
  }
}

呼叫

store.commit('increment', {
  amount: 10
})

Object-Style Commit

commit a mutation 的另一個方式

store.commit({
  type: 'increment',
  amount: 10
})

這時候,整個物件會成為 payload,故 handler 不變

mutations: {
  increment (state, payload) {
    state.count += payload.amount
  }
}

Using Constants for Mutation Types

常見到在 Flux 會使用 constants 為 mutation types,優點是可將所有 constants 集中放在一個檔案裡面,可快速知道整個 applicaiton 的 mutations

// mutation-types.js
export const SOME_MUTATION = 'SOME_MUTATION'
// store.js
import { createStore } from 'vuex'
import { SOME_MUTATION } from './mutation-types'

const store = createStore({
  state: { ... },
  mutations: {
    // we can use the ES2015 computed property name feature
    // to use a constant as the function name
    [SOME_MUTATION] (state) {
      // mutate state
    }
  }
})

Mutations Must Be Synchronous

mutation handler functions must be synchronous

如果這樣寫,當 commit mutation 時 callback 無法被呼叫。devtool 無法得知什麼時候被呼叫了 callback

mutations: {
  someMutation (state) {
    api.callAsyncMethod(() => {
      state.count++
    })
  }
}

Committing Mutations in Components

可用 this.$store.commit('xxx') 或是 mapMutations helper

import { mapMutations } from 'vuex'

export default {
  // ...
  methods: {
    ...mapMutations([
      'increment', // map `this.increment()` to `this.$store.commit('increment')`

      // `mapMutations` also supports payloads:
      'incrementBy' // map `this.incrementBy(amount)` to `this.$store.commit('incrementBy', amount)`
    ]),
    ...mapMutations({
      add: 'increment' // map `this.add()` to `this.$store.commit('increment')`
    })
  }
}

Vuex 的 mutations 是 synchronous transactions

store.commit('increment')
// any state change that the "increment" mutation may cause
// should be done at this moment.

如果需要用到 asynchronous opertions,要使用 Actions


Actions

類似 mutations,差別:

  • actions commit mutations,而不是 mutating the state
  • actions 可封裝任意非同步 operations

這是簡單的 actions 例子

const store = createStore({
  state: {
    count: 0
  },
  mutations: {
    increment (state) {
      state.count++
    }
  },
  actions: {
    increment (context) {
      context.commit('increment')
    }
  }
})

action handler 以 context 為參數,裡面是 store instance 的 methods/properties,故能呼叫 context.commit commit a mutation,context.statecontext.getters

也能用 context.dispatch 呼叫其他 actions

只使用 commit 的時候,可這樣簡化寫法

actions: {
  increment ({ commit }) {
    commit('increment')
  }
}

Dispatching Actions

store.dispatch 會驅動 actions

store.dispatch('increment')

因為 mutations 必須要為 synchronous,故如要處理 asynchronous operations,而不是直接呼叫 store.commit('increment')

actions: {
  incrementAsync ({ commit }) {
    setTimeout(() => {
      commit('increment')
    }, 1000)
  }
}

actions 支援 payload format & object-style dispatch

// dispatch with a payload
store.dispatch('incrementAsync', {
  amount: 10
})

// dispatch with an object
store.dispatch({
  type: 'incrementAsync',
  amount: 10
})

這是更真實的例子:checkout a shopping cart

actions: {
  checkout ({ commit, state }, products) {
    // save the items currently in the cart
    const savedCartItems = [...state.cart.added]
    // send out checkout request, and optimistically
    // clear the cart
    commit(types.CHECKOUT_REQUEST)
    // the shop API accepts a success callback and a failure callback
    shop.buyProducts(
      products,
      // handle success
      () => commit(types.CHECKOUT_SUCCESS),
      // handle failure
      () => commit(types.CHECKOUT_FAILURE, savedCartItems)
    )
  }
}

Dispatching Actions in Components

可使用 this.$store.dispatch('xxx')mapActions helper 在 component 中 dispatch actions

import { mapActions } from 'vuex'

export default {
  // ...
  methods: {
    ...mapActions([
      'increment', // map `this.increment()` to `this.$store.dispatch('increment')`

      // `mapActions` also supports payloads:
      'incrementBy' // map `this.incrementBy(amount)` to `this.$store.dispatch('incrementBy', amount)`
    ]),
    ...mapActions({
      add: 'increment' // map `this.add()` to `this.$store.dispatch('increment')`
    })
  }
}

Composing Actions

因 action 是非同步的,可利用 Promise 得知 action 已完成

actions: {
  actionA ({ commit }) {
    return new Promise((resolve, reject) => {
      setTimeout(() => {
        commit('someMutation')
        resolve()
      }, 1000)
    })
  }
}

現在就能這樣呼叫

store.dispatch('actionA').then(() => {
  // ...
})

////// 在另一個 action 可這樣呼叫
actions: {
  // ...
  actionB ({ dispatch, commit }) {
    return dispatch('actionA').then(() => {
      commit('someOtherMutation')
    })
  }
}

可利用 async/await 撰寫 actions

// assuming `getData()` and `getOtherData()` return Promises

actions: {
  async actionA ({ commit }) {
    commit('gotData', await getData())
  },
  async actionB ({ dispatch, commit }) {
    await dispatch('actionA') // wait for `actionA` to finish
    commit('gotOtherData', await getOtherData())
  }
}

Modules

因使用 single state tree,application 的所有 states 集中在一個物件中,如果 application 很大,store 也會很大

Vuex 可將 store 切割為 modules,每個 module 有各自的 state, mutations, actions, getters, nested modules

const moduleA = {
  state: () => ({ ... }),
  mutations: { ... },
  actions: { ... },
  getters: { ... }
}

const moduleB = {
  state: () => ({ ... }),
  mutations: { ... },
  actions: { ... }
}

const store = createStore({
  modules: {
    a: moduleA,
    b: moduleB
  }
})

store.state.a // -> `moduleA`'s state
store.state.b // -> `moduleB`'s state

Module Local State

在 module 的 mutations 與 getters,第一個參數為 module 的 local state

const moduleA = {
  state: () => ({
    count: 0
  }),
  mutations: {
    increment (state) {
      // `state` is the local module state
      state.count++
    }
  },
  getters: {
    doubleCount (state) {
      return state.count * 2
    }
  }
}

在 module action,透過 context.state存取 local state,透過 context.rootState 存取 root state

const moduleA = {
  // ...
  actions: {
    incrementIfOddOnRootSum ({ state, commit, rootState }) {
      if ((state.count + rootState.count) % 2 === 1) {
        commit('increment')
      }
    }
  }
}

在 module getter,rootState 是第三個參數

const moduleA = {
  // ...
  getters: {
    sumWithRootCount (state, getters, rootState) {
      return state.count + rootState.count
    }
  }
}

Namespacing

actions, mutations, getters 預設註冊為 global namespace

可用 namespaces:true ,自動加上 module name

const store = createStore({
  modules: {
    account: {
      namespaced: true,

      // module assets
      state: () => ({ ... }), // module state is already nested and not affected by namespace option
      getters: {
        isAdmin () { ... } // -> getters['account/isAdmin']
      },
      actions: {
        login () { ... } // -> dispatch('account/login')
      },
      mutations: {
        login () { ... } // -> commit('account/login')
      },

      // nested modules
      modules: {
        // inherits the namespace from parent module
        myPage: {
          state: () => ({ ... }),
          getters: {
            profile () { ... } // -> getters['account/profile']
          }
        },

        // further nest the namespace
        posts: {
          namespaced: true,

          state: () => ({ ... }),
          getters: {
            popular () { ... } // -> getters['account/posts/popular']
          }
        }
      }
    }
  }
})
  • Accessing Global Assets in Namespaced Modules

rootStaterootGetters 有傳入 getter function 作為第三、四個參數,且可透過 context 物件使用 properties

如果要使用 global namespace 的 actions, mutations,要在 dispatch, commit 傳入 {root:true}

modules: {
  foo: {
    namespaced: true,

    getters: {
      // `getters` is localized to this module's getters
      // you can use rootGetters via 4th argument of getters
      someGetter (state, getters, rootState, rootGetters) {
        getters.someOtherGetter // -> 'foo/someOtherGetter'
        rootGetters.someOtherGetter // -> 'someOtherGetter'
        rootGetters['bar/someOtherGetter'] // -> 'bar/someOtherGetter'
      },
      someOtherGetter: state => { ... }
    },

    actions: {
      // dispatch and commit are also localized for this module
      // they will accept `root` option for the root dispatch/commit
      someAction ({ dispatch, commit, getters, rootGetters }) {
        getters.someGetter // -> 'foo/someGetter'
        rootGetters.someGetter // -> 'someGetter'
        rootGetters['bar/someGetter'] // -> 'bar/someGetter'

        dispatch('someOtherAction') // -> 'foo/someOtherAction'
        dispatch('someOtherAction', null, { root: true }) // -> 'someOtherAction'

        commit('someMutation') // -> 'foo/someMutation'
        commit('someMutation', null, { root: true }) // -> 'someMutation'
      },
      someOtherAction (ctx, payload) { ... }
    }
  }
}
  • register global actions in namespaces modules
{
  actions: {
    someOtherAction ({dispatch}) {
      dispatch('someAction')
    }
  },
  modules: {
    foo: {
      namespaced: true,

      actions: {
        someAction: {
          root: true,
          handler (namespacedContext, payload) { ... } // -> 'someAction'
        }
      }
    }
  }
}
  • binding helpers with namespace

如果要呼叫 nested module 的 getters, action 會比較麻煩

computed: {
  ...mapState({
    a: state => state.some.nested.module.a,
    b: state => state.some.nested.module.b
  }),
  ...mapGetters([
    'some/nested/module/someGetter', // -> this['some/nested/module/someGetter']
    'some/nested/module/someOtherGetter', // -> this['some/nested/module/someOtherGetter']
  ])
},
methods: {
  ...mapActions([
    'some/nested/module/foo', // -> this['some/nested/module/foo']()
    'some/nested/module/bar' // -> this['some/nested/module/bar']()
  ])
}

可用 module namespace string 作為第一個參數鎚入 helpers

computed: {
  ...mapState('some/nested/module', {
    a: state => state.a,
    b: state => state.b
  }),
  ...mapGetters('some/nested/module', [
    'someGetter', // -> this.someGetter
    'someOtherGetter', // -> this.someOtherGetter
  ])
},
methods: {
  ...mapActions('some/nested/module', [
    'foo', // -> this.foo()
    'bar' // -> this.bar()
  ])
}

也可以用 createNamespacedHelpers

import { createNamespacedHelpers } from 'vuex'

const { mapState, mapActions } = createNamespacedHelpers('some/nested/module')

export default {
  computed: {
    // look up in `some/nested/module`
    ...mapState({
      a: state => state.a,
      b: state => state.b
    })
  },
  methods: {
    // look up in `some/nested/module`
    ...mapActions([
      'foo',
      'bar'
    ])
  }
}
  • caveat for plugin developers

如果有 plugin 提供 module,並讓使用者加入 vuex store,如果 plugin user 把 module 加入某個 namespaced module,會讓使用者的 module 也被 namespaced

可透過 plugin option 的 namedspace 參數解決此問題

// get namespace value via plugin option
// and returns Vuex plugin function
export function createPlugin (options = {}) {
  return function (store) {
    // add namespace to plugin module's types
    const namespace = options.namespace || ''
    store.dispatch(namespace + 'pluginAction')
  }
}

Dynamic Module Registration

可在 store 產生後,再透過 store.registerModule 註冊 module

import { createStore } from 'vuex'

const store = createStore({ /* options */ })

// register a module `myModule`
store.registerModule('myModule', {
  // ...
})

// register a nested module `nested/myModule`
store.registerModule(['nested', 'myModule'], {
  // ...
})

module 的 state 為 store.state.myModule and store.state.nested.myModule

動態註冊的 module,可用 store.unregisterModule(moduleName) 移除

可用 store.hasModule(moduleName) 檢查是否有被註冊

  • Preserving state

註冊新的 module 時,可用 preserveState option: store.registerModule('a', module, { preserveState: true }) 保留 state

Module Reuse

有時候需要產生 module 的多個 instance,ex:

  • 用一個 module 產生多個 store
  • 在一個 store 重複註冊某個 module

如果用 plain object 宣告 state of the module,state object 會以 reference 方式被分享,如果 mutated 時,會造成 cross store/module state pollution

解決方法:use a function for declaring module state

const MyReusableModule = {
  state: () => ({
    foo: 'bar'
  }),
  // mutations, actions, getters...
}

References

Vuex

2022/04/11

Vue AJAX with axios

axios 是支援 Promise 的 HTTP client library,Vue 可透過 axios 向 server 取得資料。使用時,可搭配 ES6 語法,用 async/await 及 Promise,可以取消 request,自動轉換 JSON。

get, post

<!DOCTYPE html>
<html lang="en">
<head>
  <!-- <script src="https://unpkg.com/vue@3.2.10"></script> -->
  <!-- <script src="https://unpkg.com/vue@3.2.10/dist/vue.global.js"></script> -->
  <script src="https://unpkg.com/vue@3.2.10/dist/vue.global.prod.js"></script>

  <script src="https://unpkg.com/axios/dist/axios.min.js"></script>

</head>

<body>

<div id="app">
  {{ info }}
</div>

<script type = "text/javascript">
const vm = Vue.createApp({
  data () {
    return {
      info: null
    }
  },
  mounted () {
    axios
      .get('1-1-axios.json')
      .then(response => (this.info = response))
      .catch(function (error) {
        console.log(error);
      });
  }
}).mount('#app')
</script>
</body>

</html>

執行頁面

{ "data": { "name": "網站", "num": 3, "sites": [ { "name": "Google", "info": [ "Android", "Google 搜索", "Google 翻譯" ] }, { "name": "Yahoo", "info": [ "Yahoo", "Yahoo", "Yahoo" ] }, { "name": "Facebook", "info": [ "Facebook", "Facebook" ] } ] }, "status": 200, "statusText": "OK", "headers": { "accept-ranges": "bytes", "connection": "Keep-Alive", "content-length": "274", "content-type": "application/json", "date": "Tue, 14 Sep 2021 09:06:24 GMT", "etag": "\"112-5cbf0e53aa9b4\"", "keep-alive": "timeout=5, max=99", "last-modified": "Tue, 14 Sep 2021 09:06:21 GMT", "server": "Apache/2.4.6 (CentOS) OpenSSL/1.0.1e-fips mod_fcgid/2.3.9 PHP/5.4.16 mod_wsgi/3.4 Python/2.7.5" }, "config": { "url": "1-1-axios.json", "method": "get", "headers": { "Accept": "application/json, text/plain, */*" }, "transformRequest": [ null ], "transformResponse": [ null ], "timeout": 0, "xsrfCookieName": "XSRF-TOKEN", "xsrfHeaderName": "X-XSRF-TOKEN", "maxContentLength": -1, "maxBodyLength": -1, "transitional": { "silentJSONParsing": true, "forcedJSONParsing": true, "clarifyTimeoutError": false } }, "request": "[object XMLHttpRequest]" }

透過 JSON 搭配 v-for

<div id="app">
  <div
    v-for="site in info"
  >
    {{ site.name }}
  </div>
</div>

<script type = "text/javascript">
const vm = Vue.createApp({
  data () {
    return {
      info: null
    }
  },
  mounted () {
    axios
      .get('1-1-axios.json')
      .then(response => (this.info = response.data.sites))
      .catch(function (error) {
        console.log(error);
      });
  }
}).mount('#app')
</script>

剛剛看到的是使用 get method,也可以用 post method 傳入參數

axios.post('/user', {
    firstName: 'Fred', 
    lastName: 'Flintstone'
  })
  .then(function (response) {
    console.log(response);
  })
  .catch(function (error) {
    console.log(error);
  });

axios.all

如果有兩個 request,並希望兩個都要完成

function getUserAccount() {
  return axios.get('/user/12345');
}

function getUserPermissions() {
  return axios.get('/user/12345/permissions');
}
axios.all([getUserAccount(), getUserPermissions()])
  .then(axios.spread(function (acct, perms) {
    // 兩個 request 都執行完成
  }));

config

可用 config 物件,傳送給 axios 的寫法

axios(config)

// Send a POST request
axios({
  method: 'post',
  url: '/user/12345',
  data: {
    firstName: 'Fred',
    lastName: 'Flintstone'
  }
});

// GET request for remote image in node.js
axios({
  method: 'get',
  url: 'http://bit.ly/2mTM3nY',
  responseType: 'stream'
})
  .then(function (response) {
    response.data.pipe(fs.createWriteStream('ada_lovelace.jpg'))
  });

axios(url[, config])

// Send a GET request (default method)
axios('/user/12345');

Request method alias

使用 alias 語法時,config 不需要指定 url, method, and data properties

axios.request(config)
axios.get(url[, config])
axios.delete(url[, config])
axios.head(url[, config])
axios.options(url[, config])
axios.post(url[, data[, config]])
axios.put(url[, data[, config]])
axios.patch(url[, data[, config]])

instance

可用 custom config 產生 instance of axios

axios.create([config])

const instance = axios.create({
  baseURL: 'https://some-domain.com/api/',
  timeout: 1000,
  headers: {'X-Custom-Header': 'foobar'}
});

instance methods

axios#request(config)
axios#get(url[, config])
axios#delete(url[, config])
axios#head(url[, config])
axios#options(url[, config])
axios#post(url[, data[, config]])
axios#put(url[, data[, config]])
axios#patch(url[, data[, config]])
axios#getUri([config])

config

以下為 config options,裡面只有 url 為必要欄位

{
  // `url` is the server URL that will be used for the request
  url: '/user',

  // `method` is the request method to be used when making the request
  method: 'get', // default

  // baseURL 會加到 url 前面
  baseURL: 'https://some-domain.com/api/',

  // 可在傳給 server 前,修改 request data 及 headers 物件
  // 只能用在 PUT, POST, PATCH, DELETE
  // 在 array 的最後一個 function必須回傳 string 或 Buffer, ArrayBuffer, FormData, Stream
  transformRequest: [function (data, headers) {
    // Do whatever you want to transform the data

    return data;
  }],

  // 可在傳送給 then, catch 以前,修改 response data
  transformResponse: [function (data) {
    // Do whatever you want to transform the data

    return data;
  }],

  // `headers` are custom headers to be sent
  // 自訂 headers
  headers: {'X-Requested-With': 'XMLHttpRequest'},

  // URL parameter,一定要是 plain object 或 URLSearchParams object
  params: {
    ID: 12345
  },

  // `paramsSerializer` is an optional function in charge of serializing `params`
  // (e.g. https://www.npmjs.com/package/qs, http://api.jquery.com/jquery.param/)
  paramsSerializer: function (params) {
    return Qs.stringify(params, {arrayFormat: 'brackets'})
  },

  // `data` is the data to be sent as the request body
  // Only applicable for request methods 'PUT', 'POST', 'DELETE , and 'PATCH'
  // When no `transformRequest` is set, must be of one of the following types:
  // - string, plain object, ArrayBuffer, ArrayBufferView, URLSearchParams
  // - Browser only: FormData, File, Blob
  // - Node only: Stream, Buffer
  data: {
    firstName: 'Fred'
  },

  // syntax alternative to send data into the body
  // method post
  // only the value is sent, not the key
  data: 'Country=Brasil&City=Belo Horizonte',

  // `timeout` specifies the number of milliseconds before the request times out.
  // If the request takes longer than `timeout`, the request will be aborted.
  timeout: 1000, // default is `0` (no timeout)

  // `withCredentials` indicates whether or not cross-site Access-Control requests
  // should be made using credentials
  withCredentials: false, // default

  // `adapter` allows custom handling of requests which makes testing easier.
  // Return a promise and supply a valid response (see lib/adapters/README.md).
  adapter: function (config) {
    /* ... */
  },

  // `auth` indicates that HTTP Basic auth should be used, and supplies credentials.
  // This will set an `Authorization` header, overwriting any existing
  // `Authorization` custom headers you have set using `headers`.
  // Please note that only HTTP Basic auth is configurable through this parameter.
  // For Bearer tokens and such, use `Authorization` custom headers instead.
  auth: {
    username: 'janedoe',
    password: 's00pers3cret'
  },

  // `responseType` indicates the type of data that the server will respond with
  // options are: 'arraybuffer', 'document', 'json', 'text', 'stream'
  //   browser only: 'blob'
  responseType: 'json', // default

  // `responseEncoding` indicates encoding to use for decoding responses (Node.js only)
  // Note: Ignored for `responseType` of 'stream' or client-side requests
  responseEncoding: 'utf8', // default

  // `xsrfCookieName` is the name of the cookie to use as a value for xsrf token
  xsrfCookieName: 'XSRF-TOKEN', // default

  // `xsrfHeaderName` is the name of the http header that carries the xsrf token value
  xsrfHeaderName: 'X-XSRF-TOKEN', // default

  // `onUploadProgress` allows handling of progress events for uploads
  // browser only
  onUploadProgress: function (progressEvent) {
    // Do whatever you want with the native progress event
  },

  // `onDownloadProgress` allows handling of progress events for downloads
  // browser only
  onDownloadProgress: function (progressEvent) {
    // Do whatever you want with the native progress event
  },

  // `maxContentLength` defines the max size of the http response content in bytes allowed in node.js
  maxContentLength: 2000,

  // `maxBodyLength` (Node only option) defines the max size of the http request content in bytes allowed
  maxBodyLength: 2000,

  // `validateStatus` defines whether to resolve or reject the promise for a given
  // HTTP response status code. If `validateStatus` returns `true` (or is set to `null`
  // or `undefined`), the promise will be resolved; otherwise, the promise will be
  // rejected.
  validateStatus: function (status) {
    return status >= 200 && status < 300; // default
  },

  // `maxRedirects` defines the maximum number of redirects to follow in node.js.
  // If set to 0, no redirects will be followed.
  maxRedirects: 5, // default

  // `socketPath` defines a UNIX Socket to be used in node.js.
  // e.g. '/var/run/docker.sock' to send requests to the docker daemon.
  // Only either `socketPath` or `proxy` can be specified.
  // If both are specified, `socketPath` is used.
  socketPath: null, // default

  // `httpAgent` and `httpsAgent` define a custom agent to be used when performing http
  // and https requests, respectively, in node.js. This allows options to be added like
  // `keepAlive` that are not enabled by default.
  httpAgent: new http.Agent({ keepAlive: true }),
  httpsAgent: new https.Agent({ keepAlive: true }),

  // `proxy` defines the hostname, port, and protocol of the proxy server.
  // You can also define your proxy using the conventional `http_proxy` and
  // `https_proxy` environment variables. If you are using environment variables
  // for your proxy configuration, you can also define a `no_proxy` environment
  // variable as a comma-separated list of domains that should not be proxied.
  // Use `false` to disable proxies, ignoring environment variables.
  // `auth` indicates that HTTP Basic auth should be used to connect to the proxy, and
  // supplies credentials.
  // This will set an `Proxy-Authorization` header, overwriting any existing
  // `Proxy-Authorization` custom headers you have set using `headers`.
  // If the proxy server uses HTTPS, then you must set the protocol to `https`. 
  proxy: {
    protocol: 'https',
    host: '127.0.0.1',
    port: 9000,
    auth: {
      username: 'mikeymike',
      password: 'rapunz3l'
    }
  },

  // `cancelToken` specifies a cancel token that can be used to cancel the request
  // (see Cancellation section below for details)
  cancelToken: new CancelToken(function (cancel) {
  }),

  // `decompress` indicates whether or not the response body should be decompressed 
  // automatically. If set to `true` will also remove the 'content-encoding' header 
  // from the responses objects of all decompressed responses
  // - Node only (XHR cannot turn off decompression)
  decompress: true // default

  // `insecureHTTPParser` boolean.
  // Indicates where to use an insecure HTTP parser that accepts invalid HTTP headers.
  // This may allow interoperability with non-conformant HTTP implementations.
  // Using the insecure parser should be avoided.
  // see options https://nodejs.org/dist/latest-v12.x/docs/api/http.html#http_http_request_url_options_callback
  // see also https://nodejs.org/en/blog/vulnerability/february-2020-security-releases/#strict-http-header-parsing-none
  insecureHTTPParser: undefined // default

  // transitional options for backward compatibility that may be removed in the newer versions
  transitional: {
    // silent JSON parsing mode
    // `true`  - ignore JSON parsing errors and set response.data to null if parsing failed (old behaviour)
    // `false` - throw SyntaxError if JSON parsing failed (Note: responseType must be set to 'json')
    silentJSONParsing: true, // default value for the current Axios version

    // try to parse the response string as JSON even if `responseType` is not 'json'
    forcedJSONParsing: true,

    // throw ETIMEDOUT error instead of generic ECONNABORTED on request timeouts
    clarifyTimeoutError: false,
  }
}

response schema

{
  // `data` is the response that was provided by the server
  data: {},

  // `status` is the HTTP status code from the server response
  status: 200,

  // `statusText` is the HTTP status message from the server response
  statusText: 'OK',

  // `headers` the HTTP headers that the server responded with
  // All header names are lower cased and can be accessed using the bracket notation.
  // Example: `response.headers['content-type']`
  headers: {},

  // `config` is the config that was provided to `axios` for the request
  config: {},

  // `request` is the request that generated this response
  // It is the last ClientRequest instance in node.js (in redirects)
  // and an XMLHttpRequest instance in the browser
  request: {}
}

可用 then 取得

axios.get('/user/12345')
  .then(function (response) {
    console.log(response.data);
    console.log(response.status);
    console.log(response.statusText);
    console.log(response.headers);
    console.log(response.config);
  });

config default

// global axios defaults

axios.defaults.baseURL = 'https://api.example.com';

// Important: If axios is used with multiple domains, the AUTH_TOKEN will be sent to all of them.
// See below for an example using Custom instance defaults instead.
axios.defaults.headers.common['Authorization'] = AUTH_TOKEN;

axios.defaults.headers.post['Content-Type'] = 'application/x-www-form-urlencoded';


//////////////////////////////
// custom instance defaults
// Set config defaults when creating the instance
const instance = axios.create({
  baseURL: 'https://api.example.com'
});

// Alter defaults after instance has been created
instance.defaults.headers.common['Authorization'] = AUTH_TOKEN;

優先順序

// Create an instance using the config defaults provided by the library
// At this point the timeout config value is `0` as is the default for the library
const instance = axios.create();

// Override timeout default for the library
// Now all requests using this instance will wait 2.5 seconds before timing out
instance.defaults.timeout = 2500;

// Override timeout for this request as it's known to take a long time
instance.get('/longRequest', {
  timeout: 5000
});

Interceptors

在 then, catch 以前,攔截處理

// Add a request interceptor
axios.interceptors.request.use(function (config) {
    // Do something before request is sent
    return config;
  }, function (error) {
    // Do something with request error
    return Promise.reject(error);
  });

// Add a response interceptor
axios.interceptors.response.use(function (response) {
    // Any status code that lie within the range of 2xx cause this function to trigger
    // Do something with response data
    return response;
  }, function (error) {
    // Any status codes that falls outside the range of 2xx cause this function to trigger
    // Do something with response error
    return Promise.reject(error);
  });

// 移除 interceptor
const myInterceptor = axios.interceptors.request.use(function () {/*...*/});
axios.interceptors.request.eject(myInterceptor);

// add interceptor
const instance = axios.create();
instance.interceptors.request.use(function () {/*...*/});

錯誤處理

axios.get('/user/12345')
  .catch(function (error) {
    if (error.response) {
      // The request was made and the server responded with a status code
      // that falls out of the range of 2xx
      console.log(error.response.data);
      console.log(error.response.status);
      console.log(error.response.headers);
    } else if (error.request) {
      // The request was made but no response was received
      // `error.request` is an instance of XMLHttpRequest in the browser and an instance of
      // http.ClientRequest in node.js
      console.log(error.request);
    } else {
      // Something happened in setting up the request that triggered an Error
      console.log('Error', error.message);
    }
    console.log(error.config);
  });

取消

用 Cancel Token 取消 request

const CancelToken = axios.CancelToken;
const source = CancelToken.source();

axios.get('/user/12345', {
  cancelToken: source.token
}).catch(function (thrown) {
  if (axios.isCancel(thrown)) {
    console.log('Request canceled', thrown.message);
  } else {
    // handle error
  }
});

axios.post('/user/12345', {
  name: 'new name'
}, {
  cancelToken: source.token
})

// cancel the request (the message parameter is optional)
source.cancel('Operation canceled by the user.');

透過 CancelToken 建立時傳入的 executor

const CancelToken = axios.CancelToken;
let cancel;

axios.get('/user/12345', {
  cancelToken: new CancelToken(function executor(c) {
    // An executor function receives a cancel function as a parameter
    cancel = c;
  })
});

// cancel the request
cancel();

References

axios

Vue 3 使用 axios 套件取得遠端資料

Vue.js Ajax(axios)

Retiring vue-resource