
Pacemaker 作為一個 cluster resource manager,負責處理多個 server node 旗下軟體的生命週期,他是透過 cluster services 監控及復原 node 的狀態,cluster service 提供 messaging 與 membership 管理機制,常見的 cluster service 有 corosync, cman及 heartbeat。
以往在處理cluster service 是用 heartbeat,但在 v3 以後,該專案拆分為多個部分,包含 Cluster Glue、Resource Agents、messaging layer(Heartbeat proper)、Local Resource Manager,以及 Cluster Reource Manager,而pacemaker 就是拆分出來的 resource manager,而新版的 heartbeat 只負責處理各 server node 之間的 messaging。
Pacemaker 主要功能包含
- server node 及 service 的故障檢測和恢復
- 多樣化的 storage,不需要 shared storage
- 多樣化的 resources,任何可以寫成 script 的服務都可以被 clustered
- 支援 fencing (STONITH),確保 data integrity
- 同時支持多種集群配置模式,規模大或小都可以
- 同時支援 quorate 以及 resource-driven 兩種 clusters
- 支援多種 redundancy configuration
- 自動化 replicated configuration,可由任意一個 node 更新 config
- 可指定 cluster-wide service ordering, colocation 及 anti-colocation
- 支援進階的 service types: (1) clones: 用在需要在多個 nodes 啟動的 services (2) multi-state: 用在 master/slave, primary/secondary
- unified, scriptable cluster management tools
STONITH: Shoot-The-Other-Node-In-The-Head 的縮寫,就是將發生問題的 node 關掉的功能,通常試用 remote power switch 來實現。
在 High-availability cluster: Node Configurations 中提到,最常見的兩個 server node 的 cluster 架構如下

如果架構牽涉到多個 nodes,則有下列的情況
Active/Active
要導向到 failed node 的 traffic,會轉送到其他 active nodes,這只能用在所有 nodes 都使用相同的 software configuration 的情況
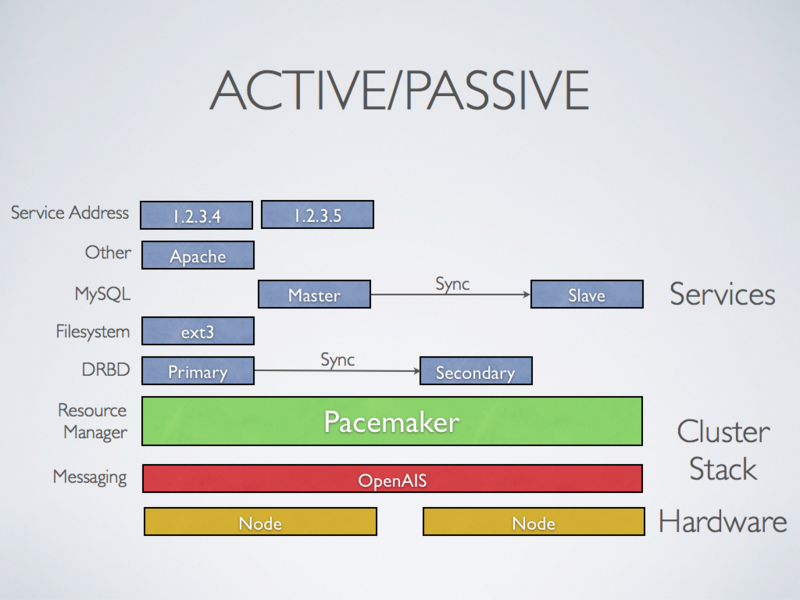
Active/Passive
每個 node 都完整提供 redundant instance,備援節點只會在 primary node failed 時,切換為 online,這種架構需要增加 hardware

N+1
提供一個單一的 extra node,會在某個 node failed 時,接手該 node 的工作,切換為 on-line,每個 node 會有不同的 software configuration,該 extra node 要能夠替代其他 nodes 的配置。當 N 為 1,就等同於 Active/Passive 的架構。

N+M
如果這個 cluster 提供了多個 services,單一個 failover node 不敷使用,這時需要多個 standby nodes
N-to-1
可讓 failover node 暫時變為 active node,直到原本的 node 已經復原並 on-line,而服務會再切換回原本的 service node。
N-to-N
合併了 active/active 及 N+M 的概念,當發生 failed node,會將 traffic 導向到其他的 active nodes,不需要 standby node,但需要所有 active nodes 都有接手其他 nodes service 的能力。

split-site
多個機房的 clustering


note: OpenAIS 是對 Service Availability Forum 的AIS (Application Interface Specification) 的實作,包含了 node 管理, messaging, monitoring 等功能,但沒有 cluster resource manager 的功能,因此需要使用 pacemaker 或 rgmanager 作為 resource manager。Corosync Cluster Engine 就是由 OpenAIS 發展而來的。
Sample: Apache httpd Active-Passive cluster
以 vagrant 準備兩個 VM: web1, web2,再根據 How To Set Up an Apache Active-Passive Cluster Using Pacemaker on CentOS 7 的說明,測試設定 web1 及 web2 為 Apache httpd Active-Passive cluster 架構。
Vagrant.configure("2") do |config|
  config.vm.provision "shell", inline: "echo Hello"

  config.vm.define "web1" do |web1|
    web1.vm.box = "geerlingguy/centos7"
    web1.vm.hostname = "web1"

    web1.vm.network "private_network", ip: "192.168.0.100"
    web1.vm.network "public_network", ip: "192.168.1.24", bridge: "en0: 乙太網路", auto_config: false

    web1.vm.provision "shell",
        run: "always",
        inline: "route add default gw 192.168.1.1"
  end

  config.vm.define "web2" do |web2|
    web2.vm.box = "geerlingguy/centos7"
    web2.vm.hostname = "web2"

    web2.vm.network "private_network", ip: "192.168.0.200"
    web2.vm.network "public_network", ip: "192.168.1.25", bridge: "en0: 乙太網路", auto_config: false

    web2.vm.provision "shell",
        run: "always",
        inline: "route add default gw 192.168.1.1"
  end
end
編輯 /etc/hosts,分別讓兩台機器都能以 hostname 連接到對方
$ vi /etc/hosts

192.168.0.100       web1
192.168.0.200       web2
安裝 apache httpd
yum -y install httpd修改 status page
$ vi /etc/httpd/conf.d/status.conf

<Location /server-status>
   SetHandler server-status
   Order Deny,Allow
   Deny from all
   Allow from 127.0.0.1
</Location>
分別在兩台機器,製作不同的首頁
$ cat <<-END > /var/www/html/index.html
<html>
<body>hello web1</body>
</html>

END
$ cat <<-END > /var/www/html/index.html
<html>
<body>hello web2</body>
</html>
END安裝 pacemaker,安裝後會產生新的帳號 hacluster
yum -y install pacemaker pcs

systemctl enable pcsd.service
systemctl start pcsd.service
設定兩台機器相同的 hacluster 密碼
sudo passwd hacluster設定 pacemaker
檢查 firewall status,如果沒有啟動,就啟動 firewalld
firewall-cmd --state

systemctl start firewalld.service
在 firewalld 新增一個 high-availability service
firewall-cmd --permanent --add-service=high-availability

# reload firewalld
firewall-cmd --reload
同時在兩台機器將 pacemaker 及 corosync 都設定為開機啟動
systemctl enable corosync.service
systemctl enable pacemaker.service
因為這兩台機器已經都安裝且設定了 pacemaker,接下來,我們只需要在其中一台機器設定 authentication
$ pcs cluster auth web1 web2
Username: hacluster
Password:
web2: Authorized
web1: Authorized
產生同步的 corosync 設定
$ sudo pcs cluster setup --name webcluster web1 web2

Destroying cluster on nodes: web1, web2...
web1: Stopping Cluster (pacemaker)...
web2: Stopping Cluster (pacemaker)...
web1: Successfully destroyed cluster
web2: Successfully destroyed cluster

Sending 'pacemaker_remote authkey' to 'web1', 'web2'
web1: successful distribution of the file 'pacemaker_remote authkey'
web2: successful distribution of the file 'pacemaker_remote authkey'
Sending cluster config files to the nodes...
web1: Succeeded
web2: Succeeded

Synchronizing pcsd certificates on nodes web1, web2...
web2: Success
web1: Success
Restarting pcsd on the nodes in order to reload the certificates...
web2: Success
web1: Success
接下來就可以看到,剛剛設定的 webcluster 已經寫入這個設定檔 /etc/corosync/corosync.conf
# more corosync.conf
totem {
    version: 2
    secauth: off
    cluster_name: webcluster
    transport: udpu
}

nodelist {
    node {
        ring0_addr: web1
        nodeid: 1
    }

    node {
        ring0_addr: web2
        nodeid: 2
    }
}

quorum {
    provider: corosync_votequorum
    two_node: 1
}

logging {
    to_logfile: yes
    logfile: /var/log/cluster/corosync.log
    to_syslog: yes
}
啟動 Cluster
pcs cluster start --all檢查 cluster 狀態
# pcs status
Cluster name: webcluster
WARNING: no stonith devices and stonith-enabled is not false
Stack: unknown
Current DC: NONE
Last updated: Mon Dec 18 07:39:34 2017
Last change: Mon Dec 18 07:39:20 2017 by hacluster via crmd on web2

2 nodes configured
0 resources configured

Node web1: UNCLEAN (offline)
Online: [ web2 ]

No resources


Daemon Status:
  corosync: active/disabled
  pacemaker: active/disabled
  pcsd: active/enabled
Note: 發生 pacemaker node is UNCLEAN (offline) 的問題,這必須要修改 /etc/hosts
分別修改 /etc/hosts 將 127.0.0.1 web1 及 web2,這一行刪除,並重新啟動 corosync
#127.0.0.1 web1 web1systemctl restart corosync.service接下來就可以看到 pcs 正常的狀態
# pcs status
Cluster name: webcluster
WARNING: no stonith devices and stonith-enabled is not false
Stack: corosync
Current DC: web1 (version 1.1.16-12.el7_4.5-94ff4df) - partition with quorum
Last updated: Mon Dec 18 07:52:36 2017
Last change: Mon Dec 18 07:45:38 2017 by hacluster via crmd on web2

2 nodes configured
0 resources configured

Online: [ web1 web2 ]

No resources


Daemon Status:
  corosync: active/enabled
  pacemaker: active/enabled
  pcsd: active/enabled
在 pcs status 看到的 STONITH(Shoot-The-Other-Node-In-The-Head) warning,可以將 stonith 關閉解決
pcs property set stonith-enabled=false在一半以上的 nodes online 時,cluster 會產生 quorum,Pacemaker 預設是在沒有 quorum 時,就會關閉所有 resources,因為現在是以兩台機器進行測試,因此要關閉 quorum 的功能。
pcs property set no-quorum-policy=ignore設定 Virtual IP
pcs resource create Cluster_VIP ocf:heartbeat:IPaddr2 ip=192.168.1.26 cidr_netmask=24 op monitor interval=20s查詢 ip addr,可發現目前 web1 有兩個 Public IPs: 192.168.1.24 及 192.168.1.26
# ip addr show

4: enp0s9: <BROADCAST,MULTICAST,UP,LOWER_UP> mtu 1500 qdisc pfifo_fast state UP qlen 1000
    link/ether 08:00:27:c4:2b:2d brd ff:ff:ff:ff:ff:ff
    inet 192.168.1.24/24 brd 192.168.1.255 scope global enp0s9
       valid_lft forever preferred_lft forever
    inet 192.168.1.26/24 brd 192.168.1.255 scope global secondary enp0s9
       valid_lft forever preferred_lft forever
    inet6 fe80::a00:27ff:fec4:2b2d/64 scope link
       valid_lft forever preferred_lft forever

# pcs status

.....

Full list of resources:

 Cluster_VIP    (ocf::heartbeat:IPaddr2):   Started web1
將 Apache httpd 加入 cluster resource,resource agent 為 ocf:heartbeat:apache
pcs resource create WebServer ocf:heartbeat:apache configfile=/etc/httpd/conf/httpd.conf statusurl="http://127.0.0.1/server-status" op monitor interval=20s要確保兩個 resource 運作在同一台機器有兩種方式
- 將 ClusterVIP 及 WebServer 綁定為同一個 resource group,並設定 ClusterVIP 啟動順序先於 WebServer
pcs resource group add WebGroup Cluster_VIP
pcs resource group add WebGroup WebServer

pcs constraint order start Cluster_VIP then start WebServer- 設定 colocation constraint
pcs constraint colocation add WebServer Cluster_VIP INFINITY測試 cluster,首先以 browser 瀏覽 Virtual IP 首頁http://192.168.1.26,畫面上會看到 hello web1
將 web1 關機
vagrant halt web1Virtual IP 首頁http://192.168.1.26,畫面上會看到 hello web2
將 web1 啟動
vagrant up web1這時還是維持在 web2,除非再把 web2 關機,服務就會回到 web1
如果希望盡量以 web1 為主,web2 為輔,當 web1 開機時,就使用 web1,必須要增加 location 限制,將 web1 的priority 調高。當 web1 offline 而 web2 online,如果 web1 online 了,網頁服務還是會回到 web1。
pcs constraint location WebServer prefers web1=50
pcs constraint location WebServer prefers web2=45
References
How To Create a High Availability Setup with Corosync, Pacemaker, and Floating IPs on Ubuntu 14.04
將 Heartbeat 換成 Pacemaker+Corosync
High Availability and Pacemaker 101!
Automating Failover with Corosync and Pacemaker
透過 PACEMAKER 來配置 REDHAT 6 HIGH AVAILABILITY ADD-ON
CentOS7 架設 RHCS (High-Availability Server)
How To Set Up an Apache Active-Passive Cluster Using Pacemaker on CentOS 7
在 CentOS7/RHEL7 上,學習架設 High-Availability 服務(一)
高可用centos7 HA:corosync+packmaker+http\mysql
使用 Load Balancer,Corosync,Pacemaker 搭建 Linux 高可用集群
CentOS 7 で DRBD/Pacemaker/Corosync で High Availability NFS
在 CentOS 7 上使用 PaceMaker 構建 NFS HA 服務
Corosync+pacemaker+DRBD+mysql(mariadb)實現高可用(ha)的mysql集群(centos7)
沒有留言:
張貼留言