
TensorFlow手寫數字辨識_CNN
以 MLP 方式建立的模型,正確率約為 96%,要再進一步提升正確率,就要使用 Yann Lecun 提出的 CNN Convolutional Neural Network。
CNN 簡介
卷積運算就是將一個影像,經過卷積運算後,產生多個影像,分為兩個部分
卷積與縮減取樣,提取影像的特徵
經過第一次卷積、第一次縮減取樣、第二次卷積、第二次縮減取樣,提取影像的特徵
完全連結神經網路
提取影像特徵後,reshape 為1維的向量,送進 平坦層、隱藏層、輸出層 組成的累身經網路進行處理
池化層用來 downsampling,優點:
- 減少所需處理的資料點:減少後續運算所需時間
- 讓影像位置差異變小:手寫數字的位置不同,會影響辨識結果,減少影像大小可讓位置差異變小
- 參數的數量與計算量下降:控制 overfitting 的問題
tensorflow CNN
import tensorflow as tf
import numpy as np

# STEP 1 讀取資料
mnist = tf.keras.datasets.mnist
# Tuple of Numpy arrays: (x_train, y_train), (x_test, y_test)

(x_train, y_train), (x_test, y_test) = mnist.load_data()

# 將 training 的 input 資料 28*28 的 2維陣列 轉為 1維陣列,再轉成 float32
# 每一個圖片,都變成 784 個 float 的 array
# training 與 testing 資料數量分別是 60000 與 10000 筆
# X_train_2D 是 [60000, 28*28] 的 2維陣列
x_train_2D = x_train.reshape(60000, 28*28).astype('float32')
x_test_2D = x_test.reshape(10000, 28*28).astype('float32')
print('x_train_2D.shape=', x_train_2D.shape)
# x_train_2D.shape=(60000, 784)

# 將圖片的數字 (0~255) 標準化,最簡單的方法就是直接除以 255
# x_train_norm 是標準化後的結果,每一個數字介於 0~1 之間
x_train_norm = x_train_2D/255
x_test_norm = x_test_2D/255

# 將 training 的 label 進行 one-hot encoding,例如數字 7 經過 One-hot encoding 轉換後是 array([0., 0., 0., 0., 0., 0., 0., 1., 0., 0.], dtype=float32),即第7個值為 1

y_train_one_hot_tf=tf.one_hot(y_train,10)
y_test_one_hot_tf=tf.one_hot(y_test,10)

y_train_one_hot = None
y_test_one_hot = None
with tf.compat.v1.Session() as sess:
    init = tf.compat.v1.global_variables_initializer()
    sess.run(init)
    y_train_one_hot = sess.run(y_train_one_hot_tf)
    y_test_one_hot = sess.run(y_test_one_hot_tf)

# 將 x_train, y_train 分成 train 與 validation 兩個部分
x_train_norm_data = x_train_norm[0:50000]
x_train_norm_validation = x_train_norm[50000:60000]

y_train_one_hot_data = y_train_one_hot[0:50000]
y_train_one_hot_validation = y_train_one_hot[50000:60000]


### 建立模型

# 先建立一些共用的函數
def weight(shape):
    return tf.Variable(tf.random.truncated_normal(shape, stddev=0.1),
                       name ='W')
# bias 張量,先以 constant 建立常數,然後用 Variable 建立張量變數
def bias(shape):
    return tf.Variable(tf.constant(0.1, shape=shape)
                       , name = 'b')
# 卷積運算 功能相當於濾鏡
#  x 是輸入的影像,必須是 4 維的張量
#  W 是 filter weight 濾鏡的權重,後續以隨機方式產生 filter weight
#  strides 是 濾鏡的跨步 step,設定為 [1,1,1,1],格式是 [1, stride, stride, 1],濾鏡每次移動時,從左到右,上到下,各移動 1 步
#  padding 是 'SAME',此模式會在邊界以外 補0 再做運算,讓輸入與輸出影像為相同大小
def conv2d(x, W):
    return tf.nn.conv2d(x, W, strides=[1,1,1,1],
                        padding='SAME')

# 建立池化層,進行影像的縮減取樣
#  x 是輸入的影像,必須是 4 維的張量
#  ksize 是縮減取樣窗口的大小,設定為 [1,2,2,1],格式為 [1, height, width, 1],也就是高度 2 寬度 2 的窗口
#  stides 是縮減取樣窗口的跨步 step,設定為 [1,2,2,1],格式為 [1, stride, stride, 1],也就是縮減取樣窗口,由左到右,由上到下,各2步
#  原本 28x28 的影像,經過 max-pool 後,會縮小為 14x14
def max_pool_2x2(x):
    return tf.nn.max_pool2d(x, ksize=[1,2,2,1],
                          strides=[1,2,2,1],
                          padding='SAME')


# 輸入層
with tf.name_scope('Input_Layer'):
    # placeholder 會傳入影像
    x = tf.compat.v1.placeholder("float",shape=[None, 784],name="x")
    # x 原本為 1 維張量,要 reshape 為 4 維張量
    # 第 1 維 -1,因為後續訓練要透過 placeholder 輸入的資料筆數不固定
    # 第 2, 3 維,是 28, 28,因為影像為 28x28
    # 第 4 維是 1,因為是單色的影像,就設定為 1,如果是彩色,要設定為 3 (RGB)
    x_image = tf.reshape(x, [-1, 28, 28, 1])

# CNN Layer 1
# 用來提取特徵,卷積運算後,會產生 16 個影像,大小仍為 28x28
with tf.name_scope('C1_Conv'):
    # filter weight 大小為 5x5
    # 因為是單色,第 3 維設定為 1
    # 要產生 16 個影像,所以第 4 維設定為 16
    W1 = weight([5,5,1,16])

    # 因為產生 16 個影像,所以輸入餐次 shape = 16
    b1 = bias([16])

    # 卷積運算
    Conv1=conv2d(x_image, W1)+ b1
    # ReLU 激活函數
    C1_Conv = tf.nn.relu(Conv1 )

# 池化層用來 downsampling,將影像由 28x28 縮小為 14x14,影像數量仍為 16
with tf.name_scope('C1_Pool'):
    C1_Pool = max_pool_2x2(C1_Conv)

# CNN Layer 2
# 第二次卷積運算,將 16 個影像轉換為 36 個影像,卷積運算不改變影像大小,仍為 14x14
with tf.name_scope('C2_Conv'):
    # filter weight 大小為 5x5
    # 第 3 維是 16,因為卷積層1 的影像數量為 16
    # 第 4 維設定為 36,因為將 16 個影像轉換為 36個
    W2 = weight([5,5,16,36])
    # 因為產生 36 個影像,所以輸入餐次 shape = 36
    b2 = bias([36])
    Conv2=conv2d(C1_Pool, W2)+ b2
    # relu 會將負數的點轉換為 0
    C2_Conv = tf.nn.relu(Conv2)

# 池化層2用來 downsampling,將影像由 14x14 縮小為 7x7,影像數量仍為 36
with tf.name_scope('C2_Pool'):
    C2_Pool = max_pool_2x2(C2_Conv)

# Fully Connected Layer
# 平坦層,將 36個 7x7 影像,轉換為 1 維向量,長度為 36x7x7= 1764,也就是 1764 個 float,作為輸入資料
with tf.name_scope('D_Flat'):
    D_Flat = tf.reshape(C2_Pool, [-1, 1764])

with tf.name_scope('D_Hidden_Layer'):
    W3= weight([1764, 128])
    b3= bias([128])
    D_Hidden = tf.nn.relu(
                  tf.matmul(D_Flat, W3)+b3)

    ## Please use `rate` instead of `keep_prob`. Rate should be set to `rate = 1 - keep_prob`.
    # D_Hidden_Dropout= tf.nn.dropout(D_Hidden, keep_prob=0.8)
    D_Hidden_Dropout= tf.nn.dropout(D_Hidden, rate = 0.2)

# 輸出層, 10 個神經元
#  y_predict = softmax(D_Hidden_Dropout * W4 + b4)
with tf.name_scope('Output_Layer'):
    # 因為上一層 D_Hidden 是 128 個神經元,所以第1維是 128
    W4 = weight([128,10])
    b4 = bias([10])
    y_predict= tf.nn.softmax(
                 tf.matmul(D_Hidden_Dropout, W4)+b4)


### 設定訓練模型最佳化步驟
# 使用反向傳播演算法,訓練多層感知模型
with tf.name_scope("optimizer"):

    y_label = tf.compat.v1.placeholder("float", shape=[None, 10],
                              name="y_label")

    loss_function = tf.reduce_mean(
                      tf.nn.softmax_cross_entropy_with_logits
                         (logits=y_predict ,
                          labels=y_label))

    optimizer = tf.compat.v1.train.AdamOptimizer(learning_rate=0.0001) \
                    .minimize(loss_function)


### 設定評估模型
with tf.name_scope("evaluate_model"):
    correct_prediction = tf.equal(tf.argmax(y_predict, 1),
                                  tf.argmax(y_label, 1))
    accuracy = tf.reduce_mean(tf.cast(correct_prediction, "float"))


### 訓練模型

trainEpochs = 30
batchSize = 100
totalBatchs = int(len(x_train_norm_data)/batchSize)
epoch_list=[];accuracy_list=[];loss_list=[];
from time import time

with tf.compat.v1.Session() as sess:
    startTime=time()

    sess.run(tf.compat.v1.global_variables_initializer())

    for epoch in range(trainEpochs):
        for i in range(totalBatchs):
            # batch_x, batch_y = mnist.train.next_batch(batchSize)
            batch_x = x_train_norm_data[i*batchSize:(i+1)*batchSize]
            batch_y = y_train_one_hot_data[i*batchSize:(i+1)*batchSize]

            sess.run(optimizer,feed_dict={x: batch_x,
                                          y_label: batch_y})

        loss,acc = sess.run([loss_function,accuracy],
                            feed_dict={x: x_train_norm_validation,
                                       y_label: y_train_one_hot_validation})

        epoch_list.append(epoch)
        loss_list.append(loss)
        accuracy_list.append(acc)

        print("Train Epoch:", '%02d' % (epoch+1), "Loss=","{:.9f}".format(loss)," Accuracy=",acc)

    duration =time()-startTime
    print("Train Finished takes:",duration)

    ## 評估模型準確率
    print("Accuracy:",
      sess.run(accuracy,feed_dict={x: x_test_norm,
                                   y_label:y_test_one_hot}))
    # 前 5000 筆
    print("Accuracy:",
      sess.run(accuracy,feed_dict={x: x_test_norm[:5000],
                                   y_label: y_test_one_hot[:5000]}))
    # 後 5000 筆
    print("Accuracy:",
      sess.run(accuracy,feed_dict={x: x_test_norm[5000:],
                                   y_label: y_test_one_hot[5000:]}))

    ## 預測機率
    y_predict=sess.run(y_predict,
                   feed_dict={x: x_test_norm[:5000]})

    ## 預測結果
    prediction_result=sess.run(tf.argmax(y_predict,1),
                           feed_dict={x: x_test_norm ,
                                      y_label: y_test_one_hot})

    ## 儲存模型
    saver = tf.train.Saver()
    save_path = saver.save(sess, "saveModel/CNN_model1")
    print("Model saved in file: %s" % save_path)
    merged = tf.summary.merge_all()
    # 可將 計算圖,透過 TensorBoard 視覺化
    train_writer = tf.summary.FileWriter('log/CNN',sess.graph)


# matplotlib 列印 loss, accuracy 折線圖
import matplotlib.pyplot as plt

fig = plt.gcf()
# fig.set_size_inches(4,2)
plt.plot(epoch_list, loss_list, label = 'loss')
plt.ylabel('loss')
plt.xlabel('epoch')
plt.legend(['loss'], loc='upper left')
plt.savefig('loss.png')


fig = plt.gcf()
# fig.set_size_inches(4,2)
plt.plot(epoch_list, accuracy_list,label="accuracy" )

plt.ylim(0.8,1)
plt.ylabel('accuracy')
plt.xlabel('epoch')
plt.legend(['accuracy'], loc='upper right')
plt.savefig('accuracy.png')

############
# 查看多筆資料,以及 label
import matplotlib.pyplot as plt
def plot_images_labels_prediction(images,labels,prediction,idx,filename, num=10):
    fig = plt.gcf()
    fig.set_size_inches(12, 14)
    if num>25: num=25
    for i in range(0, num):
        ax=plt.subplot(5,5, 1+i)

        # 將 images 的 784 個數字轉換為 28x28
        ax.imshow(np.reshape(images[idx],(28, 28)), cmap='binary')

        # 轉換 one_hot label 為數字
        title= "label=" +str(np.argmax(labels[idx]))
        if len(prediction)>0:
            title+=",predict="+str(prediction[idx])

        ax.set_title(title,fontsize=10)
        ax.set_xticks([]);ax.set_yticks([])
        idx+=1
    plt.savefig(filename)


plot_images_labels_prediction(x_test_norm,
                              y_test_one_hot,
                              prediction_result,0, "result.png", num=10)

# 找出預測錯誤
for i in range(400):
    if prediction_result[i]!=np.argmax(y_test_one_hot[i]):
        print("i="+str(i)+
              "   label=",np.argmax(y_test_one_hot[i]),
              "predict=",prediction_result[i])
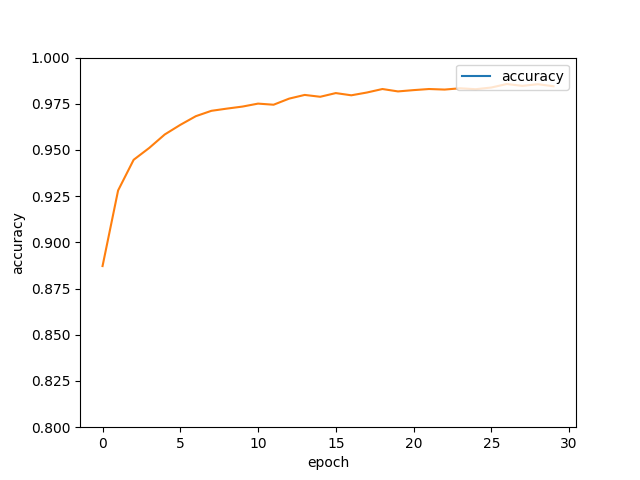
Train Epoch: 01 Loss= 1.604377151  Accuracy= 0.8872
Train Epoch: 02 Loss= 1.547111511  Accuracy= 0.9281
Train Epoch: 03 Loss= 1.525221825  Accuracy= 0.9447
Train Epoch: 04 Loss= 1.516423583  Accuracy= 0.9511
Train Epoch: 05 Loss= 1.507740974  Accuracy= 0.9584
Train Epoch: 06 Loss= 1.503444791  Accuracy= 0.9636
Train Epoch: 07 Loss= 1.496760130  Accuracy= 0.9683
Train Epoch: 08 Loss= 1.494633555  Accuracy= 0.9712
Train Epoch: 09 Loss= 1.492025375  Accuracy= 0.9724
Train Epoch: 10 Loss= 1.491448402  Accuracy= 0.9735
Train Epoch: 11 Loss= 1.488568783  Accuracy= 0.9751
Train Epoch: 12 Loss= 1.488826513  Accuracy= 0.9745
Train Epoch: 13 Loss= 1.485750437  Accuracy= 0.9778
Train Epoch: 14 Loss= 1.484605789  Accuracy= 0.9798
Train Epoch: 15 Loss= 1.483879209  Accuracy= 0.9788
Train Epoch: 16 Loss= 1.482506037  Accuracy= 0.9808
Train Epoch: 17 Loss= 1.482969046  Accuracy= 0.9796
Train Epoch: 18 Loss= 1.481315017  Accuracy= 0.9811
Train Epoch: 19 Loss= 1.480247617  Accuracy= 0.983
Train Epoch: 20 Loss= 1.480669379  Accuracy= 0.9817
Train Epoch: 21 Loss= 1.480412602  Accuracy= 0.9824
Train Epoch: 22 Loss= 1.479805708  Accuracy= 0.983
Train Epoch: 23 Loss= 1.479858279  Accuracy= 0.9827
Train Epoch: 24 Loss= 1.479218960  Accuracy= 0.9834
Train Epoch: 25 Loss= 1.479144573  Accuracy= 0.9829
Train Epoch: 26 Loss= 1.478820801  Accuracy= 0.9838
Train Epoch: 27 Loss= 1.477338433  Accuracy= 0.9857
Train Epoch: 28 Loss= 1.478171706  Accuracy= 0.9847
Train Epoch: 29 Loss= 1.477008104  Accuracy= 0.9856
Train Epoch: 30 Loss= 1.477438688  Accuracy= 0.9845
Train Finished takes: 1763.7836382389069
Accuracy: 0.988
Accuracy: 0.9814
Accuracy: 0.9928

i=18   label= 3 predict= 5
i=290   label= 8 predict= 4
i=321   label= 2 predict= 7
i=359   label= 9 predict= 8


沒有留言:
張貼留言